
| 일 | 월 | 화 | 수 | 목 | 금 | 토 |
|---|---|---|---|---|---|---|
| 1 | 2 | 3 | 4 | 5 | ||
| 6 | 7 | 8 | 9 | 10 | 11 | 12 |
| 13 | 14 | 15 | 16 | 17 | 18 | 19 |
| 20 | 21 | 22 | 23 | 24 | 25 | 26 |
| 27 | 28 | 29 | 30 |
- iOS앱배포
- JavaScript
- 스위프트
- FileOwner
- 계산기앱만들기
- spring
- 앱배포
- Swift
- 스프링
- Xcode
- 웹
- customclass
- 앱버전구하기
- 맥
- DispatchGroup
- 딩동말씀
- ios
- jQuery
- 개발기록
- 자바스크립트
- subscript
- iOS계산기
- AJAX
- MainScheduler
- 파이썬서버
- 계산기앱
- FLASK
- Python
- iOS배포
- Xib
- Today
- Total
개발하는 뚝딱이
[iOS] 커스텀 뷰 생성하기, CustomClass와 File's Owner 본문
커스텀 뷰를 생성할 일이 꽤 많은데, 다양한 방법과 사용이유를 공부해보았다!
- Storyboard나 코드로 커스텀 뷰 생성하기
- (테이블뷰나 컬렉션뷰 셀에서 File's Owner 대신에 CustomClass를 사용해야 하는 이유)
- CustomClass와 FileOwner의 차이점
- init 비교하기
Storyboard나 코드로 Custom View 생성하기
Storyboard로 CustomView 생성하기-A
1. CustomView.swift 파일 생성
import UIKit

class CustomView: UIView {

  override init(frame: CGRect) {
    super.init(frame: frame)
    commonInit()
  }

  required public init?(coder aDecoder: NSCoder) {
    super.init(coder: aDecoder)
    commonInit()
  }

  func commonInit(){
    guard let view = Bundle.main.loadNibNamed("CustomView", owner: self, options: nil)?.first as? UIView else { return }
    view.frame = self.bounds
    self.addSubview(view)
  }

  func commonInit2(){
    if let view = UINib(nibName: "CustomView", bundle: nil).instantiate(withOwner: self, options: nil).first as? UIView {
      view.frame = self.bounds
      addSubview(view)
    }
  }
}
init() 파일에서 commonInit()이나 commonInit2() 중 하나를 호출한다. commonInit()에서 Bundle.main.loadNibNamed(_:owner:options)에서 UIView를 여러 개 가져 오는데, 아래 그림처럼 xib파일 하나에서 여러 개의 UIView 생성이 가능하기 때문이다. 가져온 view는 addSubview하여 self.view에 추가해주게 된다!
(그래서 CustomView를 밖에서 소유하는 ViewController에서 아무리 ~.backgroundColor = .black을 해도 적용되지 않는다. 필요에 따라 전역변수로 만들고, view를 만든 다음 값을 할당하기도 한다.)
2. CustomView.Xib 파일 생성
3. File's Owner 선택해서 CustomClass에 CustomView 입력하기
xib에 File's Owner를 입력하는 과정은 xib를 소유하는 클래스를 정의하는 것이고 실제로 객체를 만드는 과정이 아니다. 단순히 IBActions나 outlets을 연결하기 위해서기 때문에, 1번단계에서 commonInit(), commonInit2()에서 view 객체를 생성해줘야 한다.

4. CustomView를 넣고 싶은 뷰 컨트롤러나 뷰로 가서 Storyboard 혹은 코드로, UIView를 추가해주기
Storyboard로 CustomView 생성하기-B
1. CustomView.swift 파일 생성
init() 단계에서 xib를 로드하지 않는 이유는 3번 단계를 참고하면 된다.
import UIKit

class CustomView: UIView {

  override init(frame: CGRect) {
    super.init(frame: frame)
    commonInit()
  }

  required public init?(coder aDecoder: NSCoder) {
    super.init(coder: aDecoder)
    commonInit()
  }

  func commonInit() {

  }
}
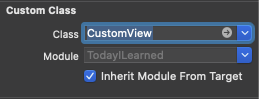
2. File's Owner의 Custom Class는 지워주고, View의 CustomClass에 CustomView 입력하기
3. 호출하는 ViewController나 View로 가서 로드해주기
첫번째 방식과 같이 commonInit()에서 xib를 호출하면, 자신이 UIView에 CustomClass 뷰를 더해주는 구조에서, 자신이 CustomClass인 뷰에서 commonInit()을 통해 xib를 호출하여 새로운 CustomClass를 더하고, 그렇게 생성된 CustomClass는 또 commonInit()을 통해 CustomClass를 더하고 무한루프에 빠지게 된다. (뼈 저리게 경험해봄...)
import UIKit

class ViewController: UIViewController {

  @IBOutlet var customView: CustomView!

  override func viewDidLoad() {
    super.viewDidLoad
  }

  override func viewWillAppear(_ animated: Bool) {
    super.viewWillAppear(animated)
    loadCustomView()
  }

  func loadCustomView() {
    if let customView = UINib(nibName: "CustomView", bundle: nil).instantiate(withOwner: self, options: nil).first as? UIView {
      customView.frame = self.customView.frame
      view.addSubview(customView)
    }
  }
}
새로 생성되는 customView에 constraints를 준게 아니거나, 위의 예시처럼 frame을 다른 뷰와 연관해서 정의하면 customView를 호출하는 시점에 신경써야 한다. 뷰가 로드된 후에, loadCustomView()를 호출하도록 하자.
Xib 없이 Custom View 생성하기
1. CustomView.swift 파일 생성
import UIKit

class CustomView: UIView {
    override init(frame: CGRect) {
        super.init(frame: frame)
    }

    required init?(coder: NSCoder) {
        fatalError("init(coder:) has not been implemented")
    }
}
2. 필요에 따라 lazy var로 필요한 UIView나 UILabel로 선언하고, 필요한 뷰들을 추가해준다.
lazy var customView: CustomView = {
    let customView = CustomView(frame: CGRect(origin: .zero, size: CGSize(width: 10, height: 10))
    view.addsubview(customView)
}()
Xib파일은 컴파일 과정을 통해 nib파일로 바뀐다. UINib은 nib파일의 컨텐츠들을 인스턴스화시킬 때 캐싱을 사용하는데 속도측면에서 효율적이다. 테이블 뷰나 컬렉션 뷰에서 셀을 계속 재사용하거나 같은 뷰를 여러번 만들어야 하는 경우가 있다. 이와 같이 nib 데이터를 여러번 인스턴스화 시킬 경우, UINib 객체를 선언하고 가져오도록 구현하는 것이 좋다.
// UICollectionView를 갖는 UIViewController나 UIView에서의 코드

let cell = UINib(nibName: "ImageCollectionViewCell", bundle: nil)
collectionView.register(cell, forCellWithReuseIdentifier: "ImageCollectionViewCell")
UITableViewCell이나 UICollectionViewCell을 상속받는 경우에는 File's Owner 대신에 CustomClass를 사용하여야 한다. 위의 코드처럼, cell 클래스의 이니셜라이저에서 xib를 호출하는게 아니라, collectionView을 참조하는 클래스에서 생성하기 때문이다.
쉽게 생각해서 nib 객체를 커스텀 뷰 안에서 만들면 File's owner로, 밖에서 만들면 CustomClass로 커스텀뷰 클래스를 지정해도록 한다.
마지막으로, UIView의 이니셜라이저 비교하기
  override init(frame: CGRect) {
    super.init(frame: frame)
    commonInit()
  }

  required public init?(coder aDecoder: NSCoder) {
    super.init(coder: aDecoder)
    commonInit()
  }
Storyboard로 UIView를 생성하는 경우, required init(coder:)가 호출된다.(Storyboard로 생성했는데 required init(coder:)가 없다면 에러가 발생한다) UIView는 NSCoding 프로토콜을 채택하고, NSCoding을 통해 데이터로 디코딩시키거나, 데이터를 인코딩 시키는 역할을 한다. 이 때 required init?(coder:)이 필요하다. 위에서 Xib를 사용하지 않고 코드로 구현한 경우에는 required init(coder:)가 필요없으므로 fatalError()가 호출되어 강제종료된다. 대신에 frame값을 주어 생성하였기 때문에 문제가 없다.
참고
https://developer.apple.com/documentation/uikit/uinib
https://gaki2745.github.io/ios/2020/06/29/iOS-Basic-xib%EC%82%AC%EC%9A%A9%EB%B2%95/
'iOS' 카테고리의 다른 글
| [iOS] 앱 버전 구하기 (0) | 2022.01.20 |
|---|---|
| [iOS] view's layout behavior (0) | 2021.03.17 |
| 유용하게 사용하는 사이트, 라이브러리 모음 (0) | 2021.03.02 |
| 기억 안날 때를 대비한 링크 모음 (0) | 2020.10.12 |
| [iOS] Core Graphic 기본 용어 정리 (0) | 2020.05.15 |


